

Learning how to brew better espresso at home begins with controlling a few variables rather than chasing one perfect recipe. Fresh coffee, a suitable grinder, accurate measurements, even puck preparation, and thoughtful tasting matter more than expensive accessories.
A useful starting recipe is 18 grams of ground coffee producing approximately 36 grams of espresso. This 1:2 brew ratio is only a baseline—not a universal rule. Your basket size, coffee, roast level, grinder, and preferred flavor may require a different dose or yield.
The goal is to make one controlled change at a time. When you know what changed, you can understand why the next shot tasted better or worse.
A Simple Espresso Recipe for Beginners
Use this recipe as an initial reference:
| Variable | Starting Point |
|---|---|
| Coffee dose | 18 grams |
| Espresso yield | 36 grams |
| Brew ratio | 1:2 |
| Approximate brew time | 25–30 seconds |
| Water temperature | Machine default |
| Basket | Double, single-wall basket |
| First adjustment | Grind size |
Your basket may be designed for 16, 18, 20, or another amount of coffee. Follow the manufacturer’s recommended range instead of forcing exactly 18 grams into every basket.
Brew time is a diagnostic measurement, not a pass-or-fail test. A 23-second shot can taste excellent, while a 30-second shot can taste unpleasant. Use the numbers to make the process repeatable, then let flavor guide the final decision.
1. Begin With a Stable Espresso Setup
Consistency is difficult when the machine, grinder, or preparation method changes between shots.
Before brewing, confirm that you have:
- An espresso machine that has fully heated
- A burr grinder capable of grinding for espresso
- A basket appropriate for your chosen dose
- A digital scale accurate to at least 0.1 gram
- A tamper that fits the basket
- Fresh water suitable for the machine
- A clean, dry portafilter and basket
- The same coffee for several practice shots
Beginners often buy multiple distribution tools before learning the fundamentals. A scale and an espresso-capable grinder usually make a greater difference than a drawer full of shiny accessories.
If your machine uses a pressurized or dual-wall basket, it will be more forgiving of pre-ground coffee and less precise grinders. A single-wall basket provides greater control but requires a finer and more consistent grind.
If you are still choosing a grinder, our blade grinder vs burr grinder comparison explains why grind consistency and adjustment matter so much for espresso.
2. Use Coffee That Is Fresh—but Not Necessarily Brand-New
Coffee begins changing after roasting. Freshly roasted beans generally provide more aroma and allow greater control than beans that have been sitting open for months.
However, beans do not always perform best immediately after roasting. Very fresh coffee can contain substantial carbon dioxide, which may make espresso flow and flavor less predictable. Many coffees benefit from a short resting period, although the ideal timing depends on the roast and roaster.
For better results:
- Buy coffee with a visible roast date when possible
- Ask the roaster for its recommended espresso resting period
- Purchase an amount you can finish while it still tastes lively
- Keep the original bag tightly sealed if it has an effective closure
- Store the coffee in a cool, dry, dark location
- Avoid keeping a frequently opened container in the refrigerator
Do not judge freshness by crema alone. Roast style, coffee species, blend composition, pressure, and basket design can all affect the appearance of crema.
3. Weigh the Dose and Espresso Yield
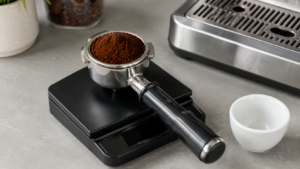
Measuring only extraction time leaves out two of the most important variables: how much dry coffee entered the basket and how much espresso reached the cup.
Place the empty portafilter on the scale and tare it. Grind the coffee, then weigh the filled portafilter to confirm the dose.
Next, place the cup and scale beneath the group head. Tare the scale again and stop the shot when it reaches your target yield.
For example:
18 g dry coffee → 36 g espresso = 1:2 brew ratio
This does not mean that 36 grams is always correct. A shorter yield may produce a more concentrated shot, while a longer yield may extract more material and create a lighter-bodied result.
Weight is generally more repeatable than judging espresso by cup volume because crema occupies space and changes as it settles.
4. Adjust Grind Size Before Changing Everything Else
Grind size is usually the most useful first adjustment when a shot reaches the target yield far too quickly or slowly.
If 18 grams of coffee produces 36 grams of espresso much faster than expected, grind finer. A finer grind generally creates more resistance and slows the flow.
If the same yield takes excessively long or barely drips, grind coarser. A coarser grind generally allows water to pass through the coffee bed more easily.
When adjusting:
- Keep the dose constant.
- Keep the target yield constant.
- Change the grinder by a small amount.
- Purge retained grounds if the grinder requires it.
- Brew another shot.
- Compare the time, flow, and taste.
Do not change the dose, grind, yield, temperature, and tamping technique simultaneously. If every variable moves, the result teaches you very little.
Not every burr grinder is suitable for espresso. The grinder must reach a sufficiently fine range and provide small enough adjustment increments to control shot flow.
For a more focused adjustment process, follow our complete guide on how to dial in espresso using dose, yield, grind size, time, and taste.
5. Distribute the Coffee Evenly
Ground coffee often lands unevenly in the basket. One area may be densely packed while another contains a mound or empty space.
If the coffee bed has weak areas, pressurized water can find an easier path through them. This is called channeling and may produce uneven extraction.
Before tamping:
- Make sure the basket is clean and dry
- Break up obvious clumps if necessary
- Spread the grounds across the basket
- Avoid spilling enough coffee to change the intended dose
- Use a repeatable distribution method
A thin-needle distribution tool can help break up clumps, but it is not compulsory. Gentle manual distribution can work when performed consistently.
Avoid repeatedly striking the portafilter after distribution. Heavy tapping may create gaps between the coffee bed and the basket wall.
6. Tamp Level and Consistently

The purpose of tamping is to compress the distributed coffee into a level, stable bed.
You do not need to win an arm-wrestling competition with the tamper. Once the coffee is evenly compressed, applying more force does not automatically improve the espresso.
Use this simple method:
- Place the portafilter on a stable surface.
- Hold the tamper level with the basket.
- Press straight down in one controlled movement.
- Check that the surface is level.
- Remove loose grounds from the basket rim.
- Insert the portafilter without knocking the puck.
A noticeably tilted tamp can encourage uneven flow. Consistent technique matters more than achieving one supposedly perfect pressure measurement.
A properly fitting tamper also helps minimize untamped coffee around the basket wall.
7. Start Brewing Without Unnecessary Delay
Once coffee is ground and prepared, insert the portafilter and begin brewing promptly.
Leaving a loaded portafilter attached to a hot group head for too long may heat the dry coffee before extraction. The effect varies by machine, but there is no advantage in waiting around while the puck rehearses its stage fright.
Watch the espresso as it flows, but do not rely on appearance alone. Pale color, rapid flow, sputtering, or multiple uneven streams may reveal a preparation problem, yet the final taste remains the most important result.
Record:
- Dose
- Yield
- Total brew time
- Grinder setting
- Coffee and roast date
- Taste
- Any visible signs of channeling
A bottomless portafilter can make uneven flow easier to observe, but it is a diagnostic accessory rather than a requirement for good espresso.
8. Evaluate Flavor, Not Time Alone
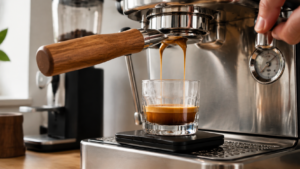
The traditional 25–30-second range is a useful starting point, but it is not a universal definition of balanced espresso.
Taste the shot after stirring it gently so that the different extraction layers are combined.
Use the following observations as clues:
| Result | Possible Cause | First Adjustment to Try |
|---|---|---|
| Sharp, thin, or intensely sour | Insufficient extraction or overly short yield | Grind slightly finer or increase yield |
| Harsh, drying, or excessively bitter | Excessive extraction or unsuitable recipe | Grind slightly coarser or reduce yield |
| Weak and watery | Yield too high or dose too low | Reduce yield or check dose |
| Heavy but dull | Yield too short or grind too fine | Increase yield or grind slightly coarser |
| Fast, spraying flow | Coarse grind or uneven puck | Grind finer and improve distribution |
| Very slow dripping | Grind too fine or excessive dose | Grind coarser and confirm basket dose |
| Inconsistent results | Retention, channeling, or changing technique | Standardize preparation and purge if needed |
These are troubleshooting starting points, not rigid laws. Sourness may be part of a coffee’s intended acidity, while bitterness can come from the roast itself rather than extraction alone.
Change only one variable and taste again.
9. Use Brew Ratio to Shape the Cup
Brew ratio describes the relationship between dry coffee dose and liquid espresso yield.
Common examples include:
18 g coffee → 27 g espresso = 1:1.5
18 g coffee → 36 g espresso = 1:2
18 g coffee → 45 g espresso = 1:2.5
A shorter ratio generally creates a more concentrated drink. A longer ratio usually creates a less concentrated beverage while allowing more extraction.
La Marzocco’s guide to espresso brew ratios provides additional examples of using beverage weight and brew time to evaluate a recipe.
Dark roasts may taste more balanced with a shorter yield, while some lighter roasts may benefit from a longer ratio. These are tendencies rather than rules.
When adjusting ratio, keep the dose steady and change the yield. This allows you to compare how the same coffee tastes at different stopping points.
10. Give the Machine Enough Time to Heat
A machine’s illuminated ready indicator does not always mean that the entire group head, portafilter, and surrounding components have reached a stable temperature.
Warm-up requirements vary substantially:
- Thermoblock and thermocoil machines may become ready relatively quickly
- Boiler machines may require more time
- Large metal groups and portafilters need time to absorb heat
- Some machines benefit from a blank water flush
- Other machines use specific temperature-management procedures
Follow the manual for your model.
Preheat the cup with hot water if desired, especially when preparing a small espresso that loses heat quickly. Keep the basket dry before adding coffee because moisture can cause grounds to stick and distribute unevenly.
Avoid excessive blank flushing unless the manufacturer recommends it. Unnecessary flushing may disturb temperature stability or waste water.
11. Use Water That Protects Flavor and Equipment
Espresso is mostly water, so its mineral composition affects both flavor and machine health.
Water that is extremely hard can encourage scale buildup. Very soft or demineralized water may produce flat flavor and may not be suitable for every machine. Distilled water should not be used automatically simply because it contains no scale-forming minerals.
The correct approach is to:
- Check the machine manufacturer’s water requirements
- Learn whether the machine has a built-in filter
- Test local tap water if hardness is unknown
- Use an appropriate filtration system when necessary
- Replace water filters on schedule
- Descale only according to the manufacturer’s instructions
Ordinary carbon filtration may improve odor or chlorine taste but does not always remove enough hardness to prevent scale.
Water recommendations differ among machines because their boilers, sensors, plumbing, and materials differ. The owner’s manual should take priority over a generic online recipe.
12. Keep the Machine and Grinder Clean
Old grounds, coffee oils, milk residue, and mineral scale can affect flavor and equipment performance.
After brewing:
- Knock out the puck
- Rinse the basket and portafilter
- Wipe loose grounds from the group area
- Empty and rinse the drip tray when needed
- Purge and wipe the steam wand immediately after steaming
- Clean spilled grounds from the grinder area
Our step-by-step guide on how to clean an espresso machine explains the daily and periodic maintenance tasks in greater detail.
At the interval specified by the manufacturer:
- Backflush compatible machines
- Use an approved cleaning tablet or detergent
- Clean the shower screen
- Remove and clean grinder components that are designed to be removed
- Replace water filters
- Descale when required
Backflushing is not appropriate for every espresso machine. Check the manual before attempting it.
Do not place water, rice, or unapproved cleaning products inside a grinder. Use the cleaning method recommended for that specific model.
How to Dial In a New Bag of Coffee
Breville’s official espresso dial-in guide also recommends measuring dose, yield, brew ratio, extraction time, and grind size as connected variables.
Use this repeatable sequence when opening a new coffee:
Step 1: Choose a Dose
Select a dose within the basket’s intended capacity. For example, begin with 18 grams in a basket designed for approximately that amount.
Step 2: Choose a Yield
Start with a 1:2 ratio:
18 g coffee → 36 g espresso
Step 3: Brew and Record the Time
Start timing according to one consistent method. Some people count from pump activation, while others count from the first drops. Either approach can work if used consistently.
Step 4: Correct Major Flow Problems
If the target yield arrives far too quickly, grind finer.
If the machine struggles to reach the target yield, grind coarser.
Step 5: Taste the Espresso
Stir the shot and taste it after it has cooled slightly. Very hot espresso can make individual flavors harder to assess.
Step 6: Refine the Recipe
Once the flow is within a workable range, use taste to decide whether to adjust the grind or target yield.
Repeat until the shot tastes balanced to you.
Why Espresso Shots Change From Day to Day
A successful recipe may require small adjustments later. Coffee changes as it ages, and kitchen conditions can also affect grinding and flow.
Possible causes include:
- Bean age
- Humidity
- Room temperature
- Grinder retention
- Burr temperature
- Inconsistent dosing
- Changing tamp or distribution
- Machine warm-up
- Water composition
- Residue inside the grinder or machine
This does not mean that the original recipe failed. Espresso preparation is an ongoing calibration process.
Make small grinder adjustments when the shot begins running noticeably faster or slower while the other variables remain stable.
Common Home Espresso Mistakes
Buying a Better Machine but Ignoring the Grinder
A high-quality machine cannot fully compensate for grounds that are inconsistent or impossible to adjust precisely.
Using a Fixed Timer as the Definition of Success
Time helps you compare shots, but the flavor in the cup determines whether the recipe works.
Changing Several Variables at Once
Multiple simultaneous changes make it impossible to identify what improved or damaged the result.
Overfilling the Basket
Too much coffee can contact the shower screen, disrupt extraction, and prevent the portafilter from locking correctly. Stay within the basket’s practical dose range.
Tamping Harder to Fix a Fast Shot
If a properly tamped shot runs too quickly, grind size is usually the more effective adjustment.
Treating Crema as a Quality Score
Crema can look attractive, but a thick layer does not guarantee balanced flavor.
Ignoring the Manufacturer’s Instructions
Cleaning, water, warm-up, descaling, and basket recommendations vary by machine. Generic advice should not override the manual.
If you are new to pressure brewing, begin with our guide explaining what espresso is and how it differs from ordinary brewed coffee.
Essential Tools and Optional Accessories
Most Useful
- Espresso-capable burr grinder
- Digital scale
- Correctly sized tamper
- Clean cloths
- Grinder brush
- Milk pitcher for milk drinks
Helpful but Optional
- Dosing funnel
- Needle distribution tool
- Bottomless portafilter
- Knock box
- Puck screen
- Temperature-controlled kettle for manual preheating tasks
Accessories can improve workflow, but they cannot replace proper grind adjustment, accurate measurement, and consistent preparation.
Frequently Asked Questions
What is the best espresso ratio for beginners?
A 1:2 ratio is a practical starting point. For example, use 18 grams of coffee to produce 36 grams of espresso. Adjust the yield according to the coffee, basket, and flavor.
How long should an espresso shot take?
Approximately 25–30 seconds is a useful initial reference, but it is not a universal requirement. Evaluate dose, yield, flow, and taste together.
Why does my espresso run too fast?
Common causes include a grind that is too coarse, insufficient coffee for the basket, or uneven puck preparation. Keep the dose and yield constant and try a slightly finer grind first.
Why is my espresso bitter?
Possible causes include a dark roast, excessive yield, very slow extraction, high brewing temperature, stale residue, or simply the coffee’s natural flavor profile. Change one variable at a time.
Can I make espresso without a scale?
You can, but a scale makes it much easier to repeat the dose and beverage yield. Volume is less reliable because crema changes the apparent amount in the cup.
Should I use filtered water?
Filtered water can improve flavor and reduce some contaminants, but not every filter removes hardness. Use water that meets your machine manufacturer’s requirements.
Do I need a bottomless portafilter?
No. It can reveal channeling and improve visibility during practice, but it does not automatically improve extraction.
How often should an espresso machine be cleaned?
Rinse and wipe the relevant brewing and steaming parts after use. Perform detergent cleaning, filter replacement, and descaling according to the manufacturer’s schedule and local water conditions.
Final Thoughts
Learning how to brew better espresso at home is less about discovering one magical setting and more about building a repeatable process.
Begin with a dose that fits the basket, measure the espresso yield, and use a 1:2 ratio as an initial reference. Adjust grind size to bring the flow into a workable range, then use taste to refine the recipe.
Keep the equipment warm and clean, prepare the puck evenly, use suitable water, and record each change. When only one variable changes at a time, even an imperfect shot provides useful information.
The best home espresso recipe is not necessarily the one that reaches exactly 36 grams in exactly 28 seconds. It is the recipe you can reproduce—and genuinely enjoy drinking.